.png?width=150&height=81&name=Houghton%20Contracting%20Logotype%20New%20Logo%20(1).png)
11 Min Read
Tackling a kitchen remodel yourself can save you serious money and give you the satisfaction of transforming your space with your own hands. A full kitchen renovation by a contractor can easily cost tens of thousands of dollars, largely due to labor. By doing much of the work DIY, you eliminate a big chunk of those labor costs; often 30-50% of a kitchen remodel budget is labor (money you can keep in your pocket).
Table of Contents
- Can You Remodel Your Kitchen Yourself?
- Essential Tools and Prep for a DIY Kitchen Remodel
- DIY Kitchen Remodel Steps: A Step-by-Step Guide
- Budget-Friendly Remodeling Tips for a Champagne Look on a Beer Budget
- Mistakes to Avoid When Remodeling Your Kitchen DIY
- DIY Kitchen Remodel FAQs
- Conclusion
In fact, a recent homeowner survey found 34% of DIYers chose to do projects themselves specifically to save money. If you're a practical-minded homeowner in Central New Jersey (Hamilton, Princeton, West Windsor, and surrounding areas) looking to remodel a kitchen on a budget, this guide will walk you through how to remodel a kitchen yourself, from planning and permits to cabinets and paint, with DIY kitchen remodel tips that actually work.
Can You Remodel Your Kitchen Yourself?
Yes, with the right planning and precautions, a homeowner can remodel a kitchen themselves, at least partially. Thousands of homeowners successfully DIY kitchen remodels every year. The key is to know your limits and understand what tasks you can handle versus where you might need help.
Many aspects of a kitchen renovation are cosmetic or straightforward and can be done without a contractor. For example, replacing cabinets, countertops, and flooring, or painting walls and trim, typically does not require a permit in many areas. In other words, you're usually free to remodel kitchen cabinets, swap out appliances, install new countertops, and refresh finishes on your own, as long as you're not altering the underlying structure or major systems.
However, some types of work do require permits or licensed professionals for safety and code compliance. In New Jersey (and most states), any changes to electrical wiring, new plumbing lines, or structural modifications (like removing a wall or changing window/door openings) will need a permit and possibly inspections.
The good news is that in many jurisdictions, homeowners are allowed to apply for permits and do the work themselves if it's their own residence (known as "owner-occupant" permits). For instance, in Hamilton Township, NJ, an owner who occupies the home can apply for the necessary electrical, plumbing, and building permits for a kitchen remodel. Always check your local building department for specific rules, but generally, as a DIYer, you can do just about anything a licensed contractor can do legally, provided you get permits for technical work and follow code requirements. When in doubt, consult your town's building office or NJ's state building codes.
Essential Tools and Prep for a DIY Kitchen Remodel
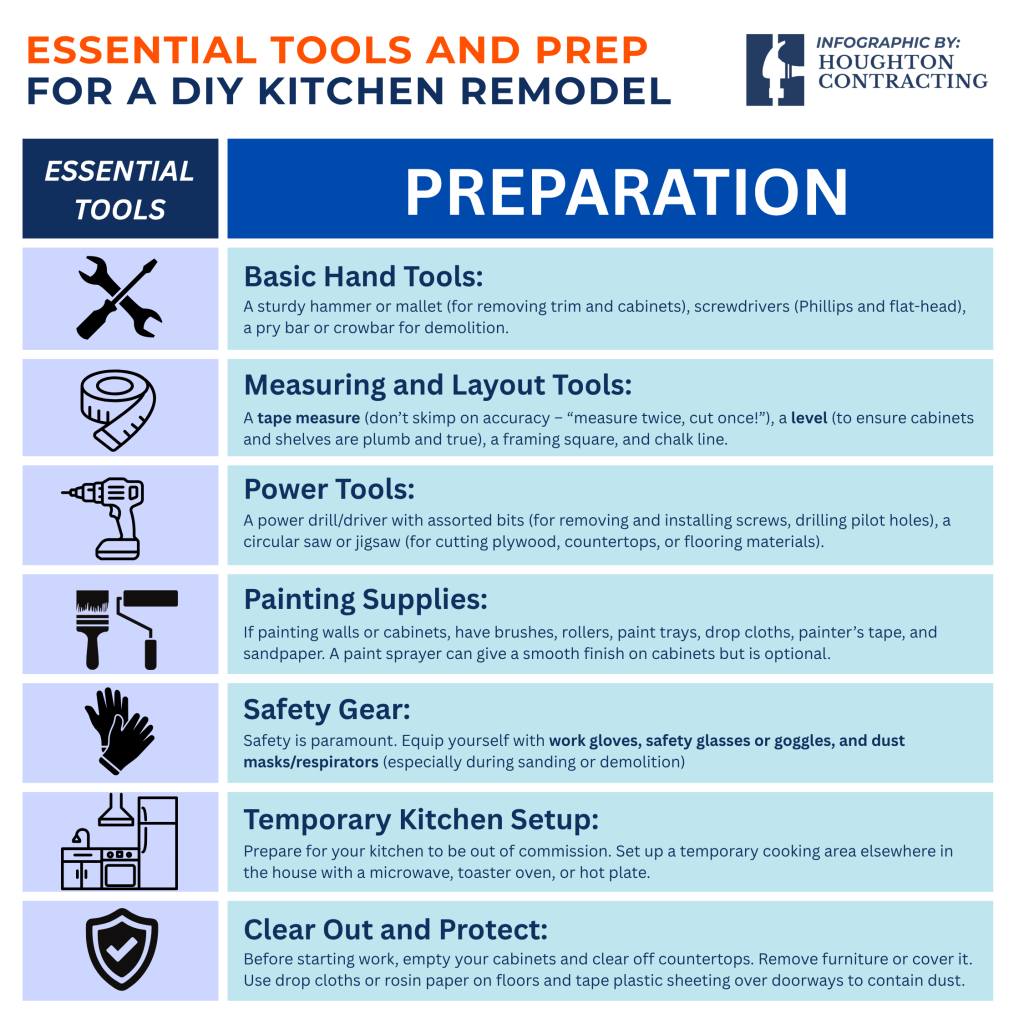
Taking on a DIY kitchen remodel means you'll be acting as the contractor, so assemble the tools and setup you'll need before you swing a hammer. Here are the essential tools and preparations to remodel a kitchen yourself:
DIY Kitchen Remodel Steps: A Step-by-Step Guide
Remodeling a kitchen involves multiple phases. Below is a step-by-step guide on how to DIY a kitchen remodel from start to finish. We'll assume you've already designed your new kitchen layout and selected materials that fit your budget. (If not, be sure to do that in the planning stage!). Remember, sticking to your existing layout (i.e. keeping sink, appliances, and walls where they are) is the cheapest way to remodel a kitchen because it avoids rerouting plumbing or electrical. This guide focuses on a budget-friendly remodel where you're not moving major utilities or walls, perfect for a DIY approach.
Step 1: Plan and Budget Your Remodel
Every great DIY remodel starts with a solid plan. First, define what you're updating and what stays. Reuse or refinish where you can; think painted cabinets over new ones. Set a realistic budget, including a 10–15% cushion for surprises. Minor remodels can run $27K; high-end jobs can soar past $150K.
Next, check if permits are needed, especially for plumbing or electrical changes. In NJ, homeowners can usually pull their own permits if it's their primary residence and they're doing the work. You likely don't need a building permit for the cosmetic portions.
Don't skip this step; unpermitted work can cost you later.
Finally, build a project timeline. Plan your tasks, allow extra time, and order materials upfront to avoid delays. Understanding how long a kitchen remodel typically takes in Central New Jersey can also give you a useful benchmark when planning your own schedule.
Step 2: Demolition, Out with the Old
With your plan and permits locked in, it's time to demo, and DIY here can save big bucks. Start smart: remove cabinet doors, drawers, and hardware (label it if reusing). Unscrew cabinets carefully; have a helper catch them as they come down.
Disconnect plumbing before pulling countertops. Laminate tops usually pop off with a utility knife and pry bar; tile takes more elbow grease. For drywall or soffits, cut clean edges before prying. Removing floors? Use a scraper or pry bar, and turn off nearby circuits; always test wires before cutting.
Bag debris as you go. Use contractor bags or rent a dumpster. Donate what you can; old cabinets or appliances might help someone else and score you a tax break.
Safety first: gloves, mask, eye protection. Watch for lead paint, asbestos, and hidden pipes or wires. Take your time; slow and steady wins the demo. Once it's all cleared out, you've got a clean slate ready for the next step.
Step 3: Install or Refurbish Cabinets
Cabinets make the biggest visual impact in your kitchen, whether you're installing new or giving old ones a facelift.
Installing New Cabinets: Start with the uppers. Mark your studs, use a ledger board for support, and have a friend help lift. Screw into studs and neighboring cabinets for a sturdy fit. Then move to base cabinets, shim as needed, and make sure everything's level. A precise install now means your countertops and doors will sit right later.
Refinishing or Refacing: On a budget? Keep your existing boxes. Clean, sand, and paint for a fresh look. Spray for a smooth finish or use a roller and brush. Refacing is another solid option, just replace the doors and drawer fronts, then add veneer. Swapping hardware or adding soft-close hinges adds a luxe touch without the price tag.
Step 4: Countertops and Surfaces
Time to tackle countertops, one of the most transformative (and fun) parts of your DIY kitchen.
For budget-friendly installs, go with laminate, butcher block, or tile. Laminate is lightweight and screws in from underneath. Butcher block needs sealing after cutting and fitting. Tile takes more effort but offers a custom look without the premium price. Feeling bold? There are even DIY concrete kits.
Install by test-fitting the top, ensuring it's level and snug to the wall. Screw it in from below, cut your sink hole with care, and reconnect plumbing using fresh supply lines and a new drain kit.
Want to level up the look? Add a backsplash. Subway tile is affordable and classic, while peel-and-stick panels offer the easiest upgrade. A good backsplash protects your walls and pulls the whole space together.
Step 5: Paint and Refresh the Walls
Countertops can totally change your kitchen vibe, and yes, you can DIY it.
Laminate, butcher block, and tile are budget-friendly picks. Laminate installs easily with screws. Butcher block needs sealing but brings warmth. Tile takes time but delivers custom charm. Brave enough? Try a concrete kit.
Test-fit everything, screw from below, and carefully cut the sink hole. Hook up your plumbing with new lines and a fresh drain kit to avoid leaks.
Boost the finish with a backsplash; classic subway tile or peel-and-stick panels both get the job done and look sharp.
Step 6: Install Flooring
Flooring comes after painting but before baseboards, to keep things clean and pro-looking.
Great DIY options for kitchens include luxury vinyl plank (LVP), peel-and-stick vinyl tiles, and laminate. They're affordable, water-resistant, and easy to install. Ceramic tile is durable and timeless but more labor-intensive. For a tile look without the effort, try floating vinyl tiles or sheet vinyl with patterns.
Prep your subfloor: clean, dry, and level is key. Follow install tips: use spacers, stagger seams, and cut carefully. For adhesive tiles, start from the center; for ceramic, spread mortar and set tiles with spacers.
No permits needed here. Just take your time, cut smart, and save a few extras for future fixes. With the floor in, your DIY kitchen is nearly there!
Step 7: Appliances and Finishing Touches
It's the final stretch, time to install appliances, fixtures, and the finishing touches that bring your kitchen to life.
Move in old appliances carefully (use sliders or a hand truck). New ones? Most plug right in. For gas ranges, reconnect the line with sealant and test for leaks, or call a pro. Hook up dishwashers, sinks, and faucets, tighten all connections, and check for leaks as you go.
Install vent hoods or microwaves if needed, making sure vents go outside when required. Add final details: cabinet hardware, light fixtures, outlet covers, and fresh caulk around sinks and backsplashes. Fill trim nail holes and do a quick paint touch-up.
Finish with a deep clean, wipe everything down, mop the floors, and polish the appliances. Step back and admire: you just remodeled your kitchen yourself!
Budget-Friendly Remodeling Tips for a Champagne Look on a Beer Budget
Remodeling your kitchen DIY-style already saves you a bundle on labor, but how else can you remodel a kitchen on a budget without sacrificing style? Here are some tried-and-true DIY kitchen remodel tips to get a high-end look for less:
- Refresh Instead of Replacing: As discussed, if your cabinet boxes are in good shape, paint or reface them rather than buying all new cabinets, this can save 30-50% of the cost. The same goes for appliances: if your appliances work well but look dated, see if you can swap out just the front panel or get them professionally refinished. Appliance paint and new hardware can sometimes work wonders (there are even stainless steel look contact papers, though results vary).
- Shop Smart for Materials: You don't have to buy everything brand-new at retail. Check out Habitat ReStore or local building salvage shops for cabinets, sinks, lighting, and hardware at a fraction of the price. You might find high-end fixtures lightly used. Also, keep an eye on clearance sales at home improvement stores for flooring and tile. Sometimes discontinued styles are deeply discounted. Just be sure to buy a little extra for future repairs since you can't easily get more later.
- DIY Custom Touches: Little upgrades can make a cheap kitchen feel custom. For instance, adding crown molding to the top of your cabinets gives a polished, expensive look with just some trim pieces and patience in cutting/installing. Under-cabinet LED strip lights cost very little but add ambiance and "designer kitchen" vibes. Consider installing a tile backsplash yourself, basic ceramic tile is cheap, but it adds huge visual impact and perceived value. Even swapping out the old fluorescent ceiling light for an attractive pendant or recessed lights can change the entire mood of the kitchen.
- Reuse What You Can: If your kitchen layout worked fine, re-use the existing appliance locations and plumbing hookups, moving plumbing or gas lines can get expensive and usually requires a licensed professional. Likewise, if the hardwood floor in adjacent rooms is in good shape, maybe you can simply refinish or match it in the kitchen rather than replacing everything. Sometimes not doing something (like keeping an existing island or not ripping out that pantry) is the best way to save money.
- Phase Your Project if Needed: If budget is really tight, you can do the remodel in stages. Perhaps paint and hardware this month, save up, then countertops and flooring next month, etc. Doing it in phases isn't as ideal as one big project (you'll live with semi-reno'd spaces longer), but it can allow you to pay as you go and take advantage of sales or second-hand finds over time.
- Energy Efficiency for Rebates: New appliances or fixtures that are energy-efficient (like an EnergyStar fridge or LED lighting) might qualify for state or utility rebates or tax credits. Check NJ programs or your electric/gas utility's efficiency incentives. This can effectively lower the cost of upgrades and save you money on bills in the long run.
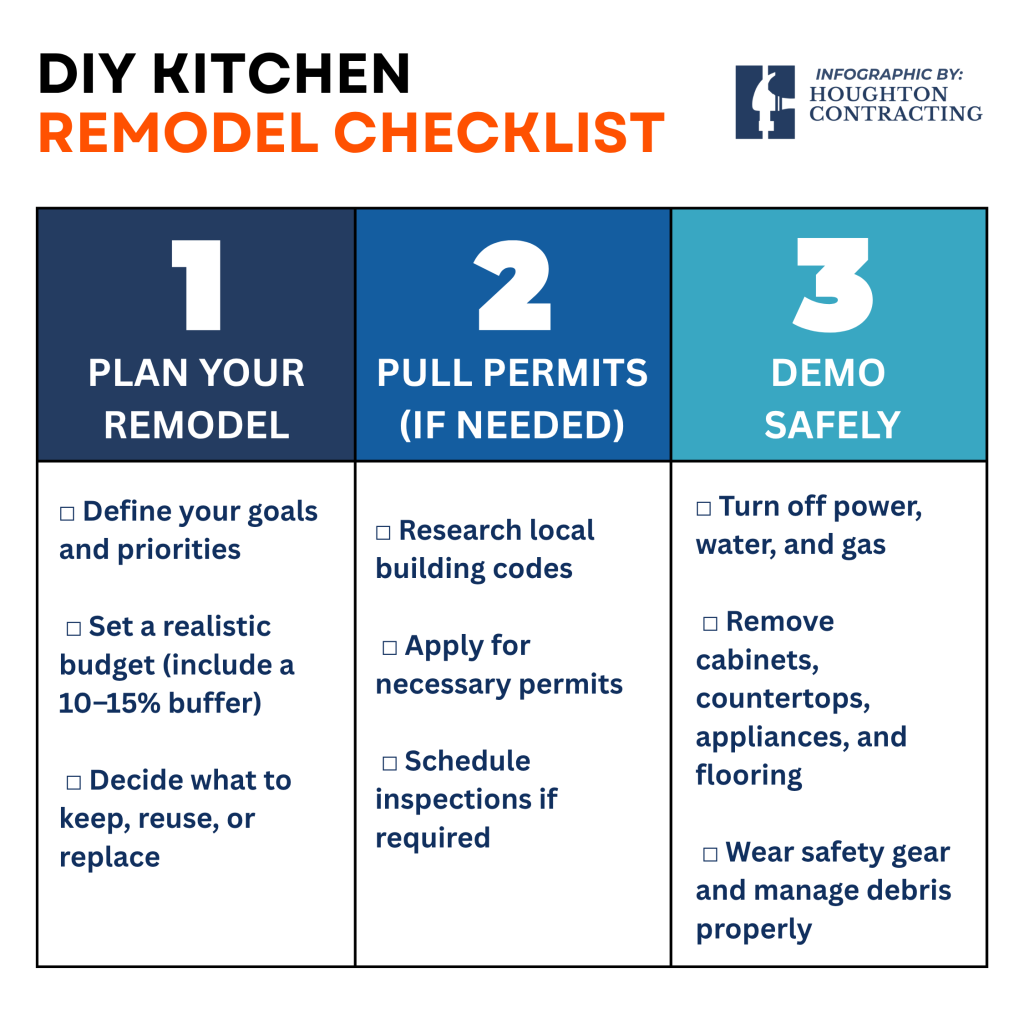
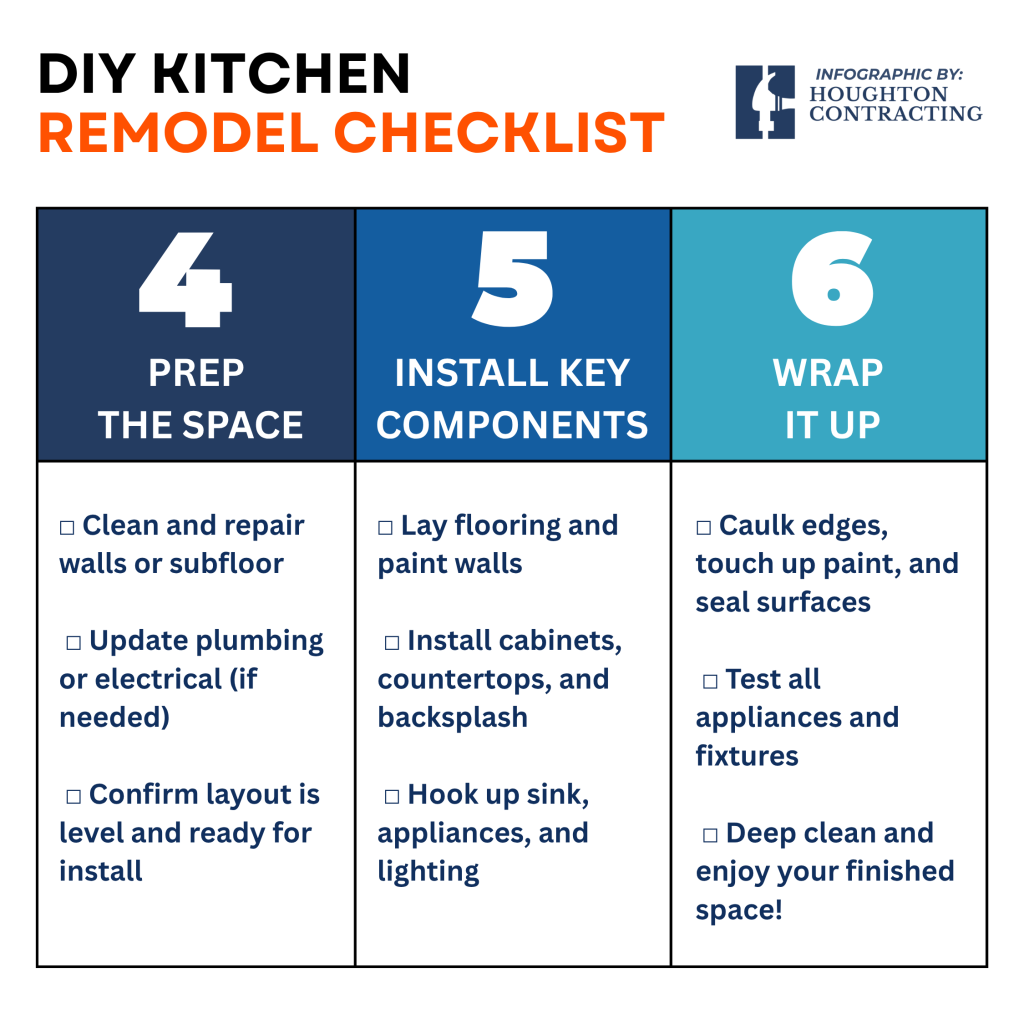
Thinking about remodeling your kitchen yourself? Use this simple 6-step checklist to stay organized, avoid costly mistakes, and keep your project moving forward, without the chaos.
Mistakes to Avoid When Remodeling Your Kitchen DIY
Even savvy DIYers can hit some pitfalls during a kitchen remodel. Here are some common mistakes and how to avoid them so your project stays on track and yields great results:
- Skipping Permits or Inspections: It might be tempting to bypass the paperwork, but doing work without required permits can lead to safety hazards, fines, or problems when selling the house. As mentioned, if you do electrical, plumbing, or structural changes, get the permits and inspections. It's about safety and protecting your investment.
- Underestimating Time and Money: A kitchen remodel, even DIY, is a big undertaking. One frequent mistake is setting an unrealistic budget or timeline. Avoid surprises by planning a buffer (extra funds and time). If you think something will take one weekend, assume it might take two or three, especially if you're learning as you go. And don't forget to include "hidden" costs like new plumbing fittings, drywall repair supplies, or takeout meals while your kitchen is out of service.
- Not Having a Plan (Design and Order of Work): Diving in without a detailed plan can cause rework or forgotten steps. Figure out your kitchen design and measure everything before you start buying or demolishing. Know the correct order of tasks, for example, you usually install cabinets before flooring (to avoid damaging new floors and so you don't pay for flooring that sits under cabinets unseen). Paint after most construction is done. Write out a sequence and stick to it so you don't accidentally paint before sanding or install floors before painting the ceiling, etc. Careful planning prevents the "oops, I should have done that first" moments.
- Working Beyond Your Skill Level: DIY is great, but be honest about what you can handle. One classic mistake is a homeowner taking on something complex (like rewiring the electrical panel or relocating plumbing in concrete slab) without the know-how, and ending up with a hazardous situation or a half-finished project. It's okay to get professional help for certain parts. You can still save money by doing the simpler tasks (demolition, painting, installing pre-made cabinets) and leaving complicated aspects to licensed pros. Don't let pride get in the way of safety or quality.
- Cutting Corners on Materials or Tools: Using the cheapest possible materials or wrong tools can backfire. For instance, thin, low-quality laminate flooring might crack or wear out quickly in a high-traffic kitchen. Cheap paint could need extra coats or not clean well. You don't need top-of-the-line everything, but do opt for decent quality materials that can withstand kitchen use. Also, not having the proper tools can lead to frustration or shoddy work, invest in or rent the right tools (your fingers and finish work will thank you). As one guide noted, not having the proper tools is a top DIY mistake.
- Ignoring Ergonomics and Layout Principles: Since you're acting as the designer, be mindful of kitchen layout basics (like the classic "work triangle" between fridge, stove, and sink, or ensuring enough clearance around appliance doors and walkways). A common design mistake is squeezing an island or peninsula in where it makes the space cramped, make sure any changes still allow for at least 36-42 inches of walkway space. Also mount cabinets and microwaves at comfortable heights, etc. Think about how you'll use the kitchen day-to-day.
- Not Preparing for Setbacks: Unexpected issues can and will arise, you might find water damage behind a sink cabinet, discover wiring not up to code, or simply have a part on backorder. Prepare mentally (and budget-wise) for some hiccups. If you open a wall and see something concerning (like mold or a structural problem), don't cover it up, address it properly, even if it means calling in an expert or adjusting your plan. It's better to fix issues now than after you've put up new drywall or cabinets.
DIY Kitchen Remodel FAQs
To wrap up, here are answers to some frequently asked questions about how to remodel a kitchen yourself and related DIY topics.
Q: Can I remodel my kitchen myself?
Yes, in most cases a homeowner can remodel their kitchen themselves. Many kitchen updates, like cabinets, counters, flooring, and painting, can be done DIY without hiring a contractor. Be sure to follow local building codes: if your remodel involves new electrical wiring, plumbing changes, or structural work, you may need permits and inspections.
Q: What's the cheapest way to remodel a kitchen?
The cheapest way is to refresh the kitchen's appearance without changing the layout or major systems. This means keeping your existing cabinet layout and updating surfaces instead of doing a full gut renovation.
Q: Do I need a permit to remodel my kitchen on my own?
It depends on what the remodel involves. Cosmetic changes (like replacing cabinets, countertops, flooring, or painting) typically do not require a permit. However, if you're doing anything that affects electrical, plumbing, or structure, you will need the appropriate permits.
Q: How do I remodel kitchen cabinets without replacing them?
To remodel or update your kitchen cabinets without full replacement, you have two main options: refinishing (painting or staining) or refacing. Refinishing involves removing the cabinet doors and hardware, cleaning and lightly sanding the surfaces, then applying paint or a new stain finish. Painting cabinets a fresh color (such as a trendy white, gray, or navy blue) can completely transform their look on a small budget, just use a good primer and enamel paint for durability.
Refacing goes a step further: you keep the cabinet boxes, but replace all the doors and drawer fronts with new ones, and apply a matching veneer to the face frames of the boxes. This gives the appearance of brand-new cabinets.
Q: How long does a DIY kitchen remodel take?
The timeline can vary widely depending on the project scope and your personal schedule. For a moderate DIY kitchen remodel (where you're not moving walls or plumbing), expect anywhere from 4 to 8 weeks of work. If you can dedicate full days to it and have some helping hands, it could be done in under a month.
Conclusion
Remodeling your kitchen yourself is an empowering project, you can save money, learn new skills, and create the kitchen of your dreams on your own terms. We've walked through how to DIY a kitchen remodel from start to finish, covering planning, tools, step-by-step processes, budget-savvy tips, and cautionary advice. Now it's your turn: take these tips and put them into action! Remember, every great renovation starts with a solid plan and the confidence to pick up the tools and begin.
If you're feeling excited but still a bit unsure about the details, that's totally normal. Even the most experienced DIYers have questions.
Need help with layout planning or choosing budget-friendly materials? We're here to help fellow Central NJ homeowners make their DIY kitchen remodel a success. With careful planning and a can-do attitude, you'll soon be cooking in a beautiful new kitchen you remodeled all by yourself, and you'll have the satisfaction (and extra savings) to prove it. Happy remodeling!


/kitchen%20island%20with%20pendant%20lights%20and%20view%20to%20dining%20room%20in%20a%20houghton%20contracting%20custom%20home%20project%20in%20trenton%20new%20jersey.jpg?width=352&name=kitchen%20island%20with%20pendant%20lights%20and%20view%20to%20dining%20room%20in%20a%20houghton%20contracting%20custom%20home%20project%20in%20trenton%20new%20jersey.jpg)
/kitchen%20wall%20of%20cabinetry%20with%20built%20in%20oven%20and%20microwave%20in%20a%20houghton%20contracting%20custom%20home%20project%20in%20trenton%20new%20jersey.jpg?width=352&name=kitchen%20wall%20of%20cabinetry%20with%20built%20in%20oven%20and%20microwave%20in%20a%20houghton%20contracting%20custom%20home%20project%20in%20trenton%20new%20jersey.jpg)